

An insanely detailed guide on recording your own audiobook or podcast.
Why I produced my own audiobook and how I did it.

Gear up for a long post. This will seem intense if you try to take all this information in at once. Bookmark this page for the future if you’re not ready to learn right now.
Also keep in mind I wrote this with audiobooks in mind, not podcasts. Much of the same information applies, of course, but this will be much more information than you’ll need if you’re just looking for a simple way to include audio in your Substack posts. (The ACX check might not be necessary, for instance.)
I thought about recording a video of me recording and editing a blog post, but video editing is also a hell of lot of work and hardly anyone watches the videos I’ve made in the past, so I’ll wait to see how this post does. If enough people show interest, I’ll consider it. (By ‘show interest’, I mean you’ll have to actually say something or spread the word or do something to get my attention, otherwise I’ll assume no one’s interested.)
WHY DIY?
In June of 2023 when I signed a publishing contract, I negotiated to keep the rights to self-publish the audiobook format of my debut novel, A Footnote to Plato (listen to the full novel for free right here on Substack). The very fact the publisher was willing to give me these rights speaks for itself; of course they had no plans to publish an audiobook. If they weren’t willing to sink thousands into professional narrators and producers (not that they don’t deserve every penny, if not more), then, I thought, why should I?
So I didn’t. Instead, I took on the project myself, and I invested almost nothing but my time. I’ve learned a great deal about the process and it was a great way to get reviews and retain some control over my work. It was also the format favored by libraries (I sold one hardcover locally and zero ebooks.) I think this is because audiobooks published by the Big Five can be obscenely expensive for libraries, so audiobooks are an area where you might gain a bit of an advantage—if you can get the attention of librarians.
Of course, audiobooks take some technical skills and a GREAT DEAL OF TIME, especially if you've never done audio recording before. I would say I spent at least half of my time looking for answers to problems, and most of those answers came from YouTube, not articles from audiobook publishing websites. Wading through all the junk on the internet was tedious and time-consuming, so I thought I would offer the solutions I found and links to some of the most useful info. I hope my tips will save someone out there a bit of time. If you think you might be interested in doing this later, I would suggest saving this post, maybe even email the link to your future self.

Note: I'm not a professional sound editor. I’m sharing tips I’ve learned from my fly-by-the-seat-of-my-pants experience in audiobook publishing. Be prepared to adapt to suit your needs. Topics I'll cover include:
Equipment
Recording/Narrating
Tips and tricks (learn from my mistakes)
Continuous recording vs. 'Punch and Roll'
Audio Editing
Essential keyboard shortcuts
ACX requirements
My Audacity editing tips
My mastering Checklist (how I pass the ACX test)
Video: Audacity editing demonstration
Distribution (for audiobooks)
Link Roundup
Equipment You’ll Need

MICROPHONE.
I use a Tula mic, which I like for its built-in noise cancellation and for its portability (I’m not getting paid to endorse it. I wish I were). I prefer to use it as a recorder rather than as a microphone, but it can be used either way. I like it for its portability and versatility, such as when I want to record myself playing guitar or castanets or whatever. To be honest, it’s super cute, which probably has more to do with its appeal for me than anything. At $259 (right now), it’s not the cheapest option out there.
Tula too much? I haven’t tried it, but people seem to like the Blue Yeti, (under $100). And there are cheaper options still.
How cheap is too cheap?
Compare this cheap lavalier mic ($15) to my Tula mic. One thing I can say about the cheap mic is that it comes with a long cord so you can get your computer/laptop far away from you. Grab your headphones and have a listen:
1. Cheap mic, raw audio:
2. Tula mic, raw audio (with built-in noise cancellation turned on):
3. Cheap mic with one pass of Audacity's noise cancellation effect at default settings (everything at 6):
4. Cheap mic with noise cancellation above + Audacity editing to pass the ACX test (more on this later):
Obviously the Tula mic sounds better, and surely there are even better mics out there. But what do you really need to make an audiobook?
As you’re listening, ask yourself whether the difference in quality would be noticeable if you weren’t comparing back-to-back samples. Listen to a few online samples of popular audiobooks and focus on the sound quality, not the narrator, not the story. How great are the differences? At what point does poor sound quality become distracting? Does truly great sound quality affect the average listener’s overall experience? Do you think the average listener notices the difference between good and great sound? These are questions you’ll need to answer for yourself. But don’t go down the rabbit hole. You’ll go crazy.
MICROPHONE STAND.
I found this cheap one for 15 bucks on Amazon, and it’s just okay. It comes with a lot of attachments and a pop filter, which is nice, but I don’t use a pop filter. (Everyone’s voice is different and you might need it, so hang onto it.) But I recently found a more professional mic stand in the house, so I use that for longer sessions.
HEADPHONES FOR MONITORING.
I used very cheap ones while producing my audiobook. Now I have nicer ones (wireless for personal use, but they can also be plugged in). Use what you have, and don’t let the audio snobs make you feel bad for it. One thing I’ll say is I don’t like earbuds because I find them uncomfortable, especially for long periods of time. Also, you don’t want to use wireless headphones for editing because of the delay.
A COMPUTER.
A QUIET ROOM. Or closet. If you like hanging out in closets.
SOUND EDITING SOFTWARE. Audacity is FREE.
PLUG-INS. (FREE) If you don't know what a plugin is, I don't either! I just go around the internet clicking on things until something works.
ACX Check plugin. You NEED this to meet ACX's recording standards. It doesn't come with Audacity.
De-Clicker plugin for Audacity. You may or may not need this. It all depends on whether your mouth makes disgusting wet noises—or what's known as 'mouth clicks', or just 'clicks'—when you record yourself talking. Nothing really fixes the problem for me, but this is way better than the "Click Removal" tool that comes with Audacity, which does nothing whatsoever. Notice the different name. De-clicker, sort of good. Click-removal, not good at all.
Here's info on how to install the above plugins (Nyquist): Audacity Plugin Installation.
Recording/Narrating Tips
I DON’T FRET OVERLY MUCH ABOUT PERFORMANCE. It takes a long time to produce an audiobook, and I don't have the wherewithal to think about the variety of ways each sentence could be performed. I'm just trying not to stumble over the words. Besides, I wrote the damn thing (many, many, many times, in fact), which puts me at a great advantage as a narrator. Sure, I’ll put some emotion into it when needed, but I don’t come up with different voices for all my characters. From looking at audiobook reviews, I gather listeners vary quite a lot in their preferences (and you can be sure someone will complain about anything you decide to do), but overall, people don’t seem to mind a narrator who does nothing more than narrate. What they do mind is someone who hams it up to do character voices… and fails. Maybe you’re really good at it. Okay, go for it then. (But do get feedback to be sure). I’ve done character voices for short stories, but I didn’t think I could last for an entire novel. And trust me, it is a long haul. Whatever you choose to do, keep in mind you need to be consistent.
DON’T OVERDO IT WITH SOUND EFFECTS AND MUSIC. Negative audiobook reviews tend to be about hating the narrator's voice, the poor quality of the audio, or the sound effects. (A common complaint is against sound effects that copy the text, like when "he heard the door slam" is followed by the sound of a door slamming). For my audiobook I used one minimal sound effect (low volume wind chimes) to indicate a shift in point of view within a chapter—an audio version of a space or line break. Often times narrators leave a fairly long pause, but I worried the listener might think something had gone wrong; after all, that's why elevator music plays through the phone when you're on hold. So I came up with the idea of using the sound effect instead. Unfortunately I think my sound effect only confused people who are used to pauses. Next time I think I'll use a short pause, maybe three seconds or so.
For my Substack serialized podcast, I included a bit of music.
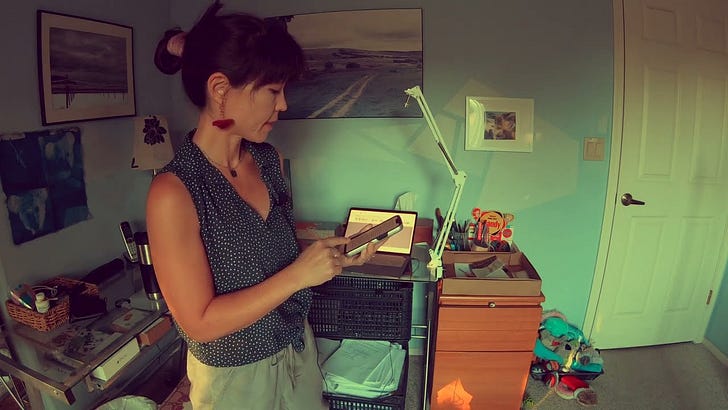
READ FROM A PHONE OR TABLET to minimize page-turning noises.
TURN OFF HEATER/AC. I try to remember to do this, but don’t always succeed.
DON’T CHASTISE YOURSELF by cursing and sighing every time you fumble the words. Tantrums cost a great deal in editing time. Again, I don't always succeed in this.
SOUNDS RECORDED TOGETHER CANNOT BE SEPARATED. Assume anything you pick up is going to be all but impossible, if not indeed IMPOSSIBLE, to separate out later.
IF IN DOUBT, REPEAT. I think it’s better to just repeat a phrase you're unsure of until you're confident you have at least one good take, that way you can capture the same ambient background as the rest of the recording session. It’s not always possible to recreate that background sound when you record later, even when you're recording in the same room with the same setup.
RECORD CLEAN THE FIRST TIME. Filters suck. Consider them a last resort. It’s not at all like editing video, as audio can’t always be fixed later. Double check your sound levels before going into it. Trust me. It really sucks to find out at the end of a long session that your recording volume (gain) was too low. You can't really fix that with editing. In theory you can, and no doubt you'll try, but trust me, everything will get screwed up and it'll be a massive waste of time. You'll know you're wasting your time when passing the ACX test (more on that later) starts to feel like a Rubik's cube—every time you solve one problem another crops up as a consequence. Unless you really know what you're doing, it'll actually be faster to re-record. Sorry.
MOUTH NOISES ARE A REAL BEAR. There is no real fix for those disgusting sounds known as ‘mouth clicks’. The best solution I’ve found is to take small sips of water while recording, but it’s a very temporary solution. The De-Clicker plugin above has major drawbacks, since it alters and degrades other sounds, so rather than use it on an entire track, I'll use it only on small fragments of audio. See above.
SLOW DOWN. NO REALLY, S-L-O-W DOWN. When I first began recording, I had to focus on slowing down. It’s very hard and I didn’t always succeed. I think many people have this problem. It’s natural to be nervous, even if no one else is in the room.
PICK CLARITY OVER PERFORMANCE. It’s a little awkward, but I try to enunciate ever so slightly more than my normal, natural speech. I came to this by thinking about the typical audiobook listener—the sleepy commuter, the parent with screaming kids, the teenager going for a jog. Distracting situations, all of them. People who like audiobooks tend to like multitasking, and while they don’t want to listen to an artificial-sounding voice, they aren’t interested in hitting the rewind button either. You’re character may be mumbling, but you don’t want acting to overshadow comprehensibility. It’s a give and take. If in doubt, err on the side of clarity.
FIND YOUR RECORDING STYLE. I prefer to do continuous recording, which is where you just hit record and every time you mess up, you pause, back up to the beginning of the sentence, and start again, all the while recording everything in one long take which you will then edit later.
I have tried ‘punch and roll’—edit as you go—and I really liked it at first. But then my laptop fan kicked on . . . and off . . . and on . . . (Granted, it was June in Tucson with the AC shut off.) If you’re interested in trying ‘punch and roll’, here’s an example of what it’s like:
Note: I’m using the cheap lavalier mic mentioned above to record, not my Tula mic, and the sound you're hearing in the video is coming from my GoPro, which just might be the worst audio recorder in the world.
Punch and Roll recording allows you to hear a few seconds of your reading so you can pick up recording seamlessly where you left off. When you mess up, just stop the recording and place the cursor to a convenient spot in the audio track where you want to begin recording again, then type: “Shift” + “D”. Playback will begin a few seconds before the point you indicate. When the playback reaches the spot you’ve indicated with your cursor, you’ll hear silence. This is when you need to start reading. Like, now. Recording happens automatically, so you don’t have to hit the “record” button again. It takes some time to get the hang of it, but I found the process fairly intuitive. The big benefit is you save time in editing. The main drawback is you get pulled out of the reading, as you can see in the video. If I had the right setup, I would love punch and roll. But alas.
More on how to do punch and roll recording.
Audio Editing…the fun stuff!
(just kidding, it’s not fun.)
ACX (Amazon) Requirements
If you pass the ACX requirements, you’re good to go for the other distributors such as Findaway Voices (which distributes to many other retailers). So focus on passing ACX. (This is why you'll need the ACX check plugin for Audacity).
Keyboard shortcuts you need to know
Instructions below are for Mac.
For Windows PCs, I hear you can use the ‘Ctrl’ key or the Windows logo key instead of the ‘Command’ key.
To select ALL audio (all audio in all tracks)—‘Command' + ‘A’ (This means you hold down the ‘Command’ key while pressing ‘A’ on your keyboard.) If you want to select only one track, click on the light grey bar above the track. If you want to select only one part of a track, click and drag your mouse over the area to highlight it.
Spacebar—either plays or pauses the audio.
To repeat the last thing you did—‘Command’ + ‘R’
To undo the last thing you did—‘Command’ + ‘Z’
Cut (or Copy)—Select the snippet of audio you want to edit, point your cursor on the highlighted area and right click. Select ‘Cut’ (or ‘Copy’) from the drop-down window. (See video.)
Paste—Click on the exact spot in the track where you want your new audio to appear (zoom in first if you need to) and ‘right click’ there. Select ‘Paste’ from the drop-down window. (See video.)
I know some of you are laughing at me for giving cut and paste instructions. All I can say is, don’t assume! It wasn’t until recently that I learned how to do a screenshot. You know, on purpose.
My Audacity Editing Tips
IT LOOKS SCARIER THAN IT IS. I don’t know what all the buttons are for. I ignore most of them. Really, the less editing you do—which means the less editing you have to do—the better.
PRACTICE FIRST, START SMALL. If you have a Substack newsletter, this environment is a great place to begin learning about audio. You can record a voiceover of a post without having to set up a full-on podcast (but keep in mind it’s easier for your readers to download a podcast episode than a voiceover, or so I hear). If you've already recorded something, go ahead and upload or drag it into Audacity. Make sure you keep the original file somewhere safe, then mess around without fear.
YOU NEED TO ‘RESCAN AUDIO DEVICES’ every time you change playback or recording devices (like when you want to monitor using headphones rather than listening through your computer’s speaker). Go to the top bar and click “Transport”, “Rescan Audio Devices”. Then go to “Audio Setup” and select your playback device. If you don’t, you’ll keep getting an annoying pop-up message.
CHECK YOUR SAMPLE RATE. For audiobooks, you want to stick to 41000 Hz. I don’t know why, I just do what they tell me to do. I don’t know if this matters for podcasting.
YOU MUST SELECT/HIGHLIGHT THE AUDIO FILE OR THE AUDIO CLIP YOU WANT TO CHANGE BEFORE ANY EFFECT OR CHECK CAN BE APPLIED TO IT. Again, you’ll get a pop-up message telling you when you forget to do this. This gets really old—obviously I want to apply this effect to everything, gah, why can’t you read my mind Audacity?—but you’ll get the hang of it.
LET THE RECORDING RUN FOR TEN SECONDS OR SO BEFORE YOU BEGIN TALKING. What you’re doing here is recording the sound of the room, the background sounds that you normally don’t notice. This will be useful when you sit down to edit.
BE CAREFUL ABOUT SPLITTING AND JOINING CLIPS. "Split" and "Join" are not the same thing as "Cut" and "Paste". When you split a track, you get two separate tracks, but when you "Cut" a portion of audio and "Paste" it elsewhere in the track, the track remains whole. If you split and join tracks to do your detailed editing (to get rid of mistakes), you risk introducing tiny fragments of dead silence into your audio. Introducing even one fraction of a second of dead silence into your audio means you will not pass the ACX test. I learned this the hard way. This is why I recommend cutting and pasting rather than splitting and rejoining tracks. There is a way to find the dead silence if you find yourself in this pickle, but it’s a rather convoluted process and I don’t remember how I did it. None of this is meant to scare you away from ever splitting a track. I do it all the time (sometimes I accidentally hit the "Stop" button on my recorder instead of the "Pause" when I'm in the middle of recording a chapter, which means I later have to join those two tracks). I’m only saying this because when you’re midway through an edit and bleary-eyed and you can’t stand to hear your own voice anymore, it’s very easy to miss the fact that you didn’t scoot one track right up against the other before joining them. Don’t learn the hard way like I did.
FIND AN ‘ORDER OF OPERATIONS’ THAT MAKES SENSE FOR YOUR VOICE AND YOUR SETUP. WRITE THESE SETTINGS DOWN! Then, you know, follow them. (This is hard for me, doing things in order, following rules…meh.)
CONSIDER SPIKING YOUR AUDIO WHILE RECORDING (blowing raspberries into the mic does the job and lets off some steam to boot) to make mistakes easier to find in the waveform later. You can go to “View” and check “Show Clipping in Waveform” to see audio that’s ‘clipped’ or distorted, and these areas will show up in red. ANOTHER OPTION: Simply be quiet for a few seconds. That quiet will show up on the waveform as a flat line—like in the movies when someone dies.
I don't bother to spike my audio anymore because I tend to run effects at the beginning, which levels out clipped (spiked, distorted) audio. The reason? I don't like wasting my time with minor edits unless I know I can get the audio to pass the ACX test first. (Plus, I don’t like listening to crappy audio while I’m editing.) So I run my effects through (but never any sort of de-clicker over the whole track!), make sure I pass ACX, then do my cuts, then run the ACX check again at the end, and finally I'll run Loudness Normalization (more on this below) one more time because cutting out bits of audio changes the average loudness, and I want all my chapters to be roughly the same.
BEWARE OF AUDACITY’S DESTRUCTIVE EDITING. This is the reason you're not "supposed" to apply effects until the end. Let’s say at the very beginning of your editing session you apply some effect, but later on you realize you don’t like it. The only way to remove that effect is by hitting ‘undo’ (or Command Z) until you get back to the point in time when you applied it, which means you lose all the work you’ve put in since then. Better to save effects for the end of the process, if you can stand it.
OR Apply the effect to a duplicate track, but not the original, and edit both the original and duplicate at the same time. This is a bit complicated, as you’ll need to mute and synchronize your duplicate track, so I will refer you to the video.
RUN THE ACX CHECK FREQUENTLY, especially after applying effects.
TO CHECK FOR BLOOPERS, GET A LITTLE HELP FROM YOUR FRIENDS. Distributors usually offer authors free codes precisely for the purpose of gifting them for advance reviews or promos. Why not send them to your audiobook-loving friends with a little note asking them to let you know if they come across any bloopers? (Thanks Mike and Petra!) Your friends may not be the best proofreaders for print books, but mistakes in audio are harder to miss harder to miss than typos in printed text. ;)
My Audio Mastering Checklist
After a lot of trial and error, these are the effects I use. In other words, with my equipment and my voice, I know I can pass the ACX check by using these effects. I don’t always use all of them. You might have to make adjustments depending on your situation. Not a bad idea to take notes and make your own mastering checklist (including order of operations) once you find out what works for you.
Here’s the goal:

My quick editing list (updated 2024):
Check sample rate (41000Hz).
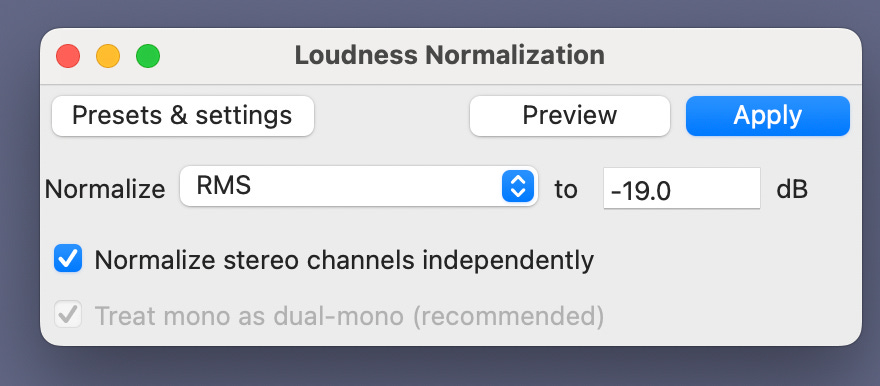
Loudness Normalization (-19 or so).
Limiter (see below for settings).
Noise reduction. (You’ll have to find your best settings; start with default).
Run ACX check.
Begin editing the waveform…cut out bloopers and clean up mouth clicks.
Run ACX check.
Fix Loudness Normalization, if necessary.
Run ACX check. If ‘pass’…
Export MP3 or WAV (Check to see what’s suitable for your purposes. WAV is better but takes up more space. MP3 works well for most purposes.)
Explanation of above
CHECK YOUR SAMPLE RATE. For audiobooks you want to stick to 41000 Hz. I don’t know why, I just do what they tell me to do. I don’t know if this matters for podcasting. (See video below for details.
LOUDNESS NORMALIZATION changes the RMS level as well as the Peak level. RMS stands for "root mean square”. Whatever. Think of it as the average loudness of your audio. Here are my settings for Loudness normalization (average loudness of the waveform): Normalize RMS, -19 or -20.
LIMITER: Soft Limit, Input gain (dB): 2.5 (both for stereo), Limit to (dB): -3.50, Hold (ms): 1.00, Apply Make-up Gain: No.

NOISE REDUCTION. This last step is somewhat optional for me, but it probably won’t be optional for you unless your mic comes with built-in noise reduction or you’re recording in a sound-proofed room (lucky you). You may even have to start your order of operations with noise reduction before you apply the other effects.
The ‘Noise floor’ is simply the sound of the room by itself, which is always in the background and will make itself clear in the seemingly-empty spaces between speech. Sometimes I’ll hear a hiss or hum in the background even though I’ve passed the ACX test, so I'll do a very light application of the Noise Reduction effect to get rid of it. But because I already have noise reduction applied (it comes with the Tula mic), I won’t use the default settings, as that would make my noise floor too quiet—you should know this is an unusual thing to have to worry about. For this I’ll reduce “Noise reduction (dB)” to “1” and see if it passes the ACX test.
Before running the noise reduction, you’ll need to “Get Noise Profile” first. This means you need to highlight/select a bit of audio within the track in which there is no speaking, then click “Get Noise Profile”. You do this in order to tell Audacity what the noise floor is in your recording so it knows what to filter out. See video below for details.

COMPRESSOR: Use sparingly! I’m reluctant to even include this one (and didn’t include it on my short list) since I don’t use it at all anymore. According to the Audacity manual, this reduces the dynamic range of your audio and allows you to amplify your audio further than normal without clipping (distortion from too much gain). I used this on every track for my audiobook, A Footnote to Plato, but later I realized I didn't need it and probably shouldn’t have used it. Here are the settings I used when I used the compressor: Threshold, -12dB; noise floor, -40; ratio 5:1:1; attack 0.20; release time, 1.0 secs; (no boxes checked below).

FINE TUNING: Sometimes I’ll run the Loudness Normalization effect one last time at the end of editing. I do this because I'm trying to keep each chapter of my audiobook at around the same RMS level (-19 dB) so listeners don't have to keep adjusting the volume between chapters. Because cutting clips changes the average loudness little by little, I sometimes find at the end that the RMS level has strayed a wee bit more than I would like from my preferred -19 dB, so I’ll run it again.
RUN THE ACX CHECK ONE LAST TIME (Go to “Analyze”, “ACX Check”):

EXPORT as MP3 or WAV. If you’re recording an audiobook, be sure to name each chapter consistently so you don’t get confused later.


Video demonstration
No audio in the demonstration. This is just to show you what things look like in Audacity.
Distribution
I’m not the best person to talk to about distribution since I published my audiobook back in 2023, and things change fast.
What I wish I did differently: I should have uploaded my files to Amazon’s Audible (through ACX) first and separately from other aggregate distributors, that way I would have been able to get a higher royalty rate, and I would have had access to Audible’s free audiobook codes to give away to people. Instead I distributed exclusively through Findaway Voices, which means I got a doubly-lower Audible royalty rate. Findaway Voices take a cut from my audiobook sales through Audible on top of Audible’s cut which is on top of a lower royalty percentage from Audible for not distributing exclusively through them. STUPID TINA! Plus I missed out on access to those Audible codes, which I really would have liked. I guess all that recording fried my brain. I did get Findaway Voices audiobook codes which I’m using here on Substack to give to paid subscribers. So there’s that. No one has used them. Go figure.
Keep in mind, the info above may have changed by now. I’m just telling you my story so you’ll have these things in mind when you make your distribution decisions.
No matter what distributor you use, they’ll take a cut. I liked the convenience of Findaway Voices rather than distributing individually to various retailers, but keep in mind they will always take their cut on top of the amount the retailer takes. The amount Findaway Voices takes depends on the retailer they’re distributing to.
SUBSCRIPTION MODELS: The above applies only if someone buys your audiobook outright. There are subscription models as well, and you can expect to be screwed over by them. (I once got a payment for something like 13 cents. Whoop whoop.)
LACK OF TRANSPARENCY: Maybe you’ve self-published ebooks in the past. Don’t expect that level of control over with audiobooks. You won’t always get to set your own prices (certainly not on Audible). You’ll run sale prices that won’t go through or won’t go as expected. You won’t get to opt out of things you think you should be able to opt out of. You will have no idea what’s going on most of the time when it comes to distribution. It’s really a mess. Everyone takes their cut and keeps you in the dark. It’s not your fault you don’t know what’s going on. Don’t feel like you’re incompetent for not being able to find out things that you think you should be able to easily access. It’s called being an artist. Everyone will rob you blind and there’s nothing you can do but bitch if that makes you feel better.
Notes on promotion
USE YOUR SUBSTACK: Let people know, obviously. Don’t expect much. Seriously.
LIBRARIES: Definitely let your local library know about you and your audiobook. This is a no-brainer. They will usually say yes if you write a nice note to a librarian. My local library even purchased a hardcover copy of my book on top of several copies of my audiobook, which was nice and unexpected. It may sound like not much, but libraries made up more than half of the total profit (to call what I made ‘a profit’ is a joke, but there you go), even though the sales numbers were much, much lower.
You won’t be able to directly contact libraries other than your own local library, so get your friends and everyone you know from other parts of the country to request your audiobook through their libraries. Anyone with a library card can request your audiobook through their library’s website. The request form is usually fairly easy to find, but make it easier for people to support you by sending them the link to their local library’s request form. Mass emails saying “request my book from your local library” generally won’t work. Remember, you’re asking for a favor. Definitely tell your local library about your book. Not every library will say yes to a request to carry your book in whatever form, but they’re more likely to say yes to a library patron than an author (sometimes their websites make it impossible to contact them without a library account), and even more likely to say yes to an audiobook, especially if you price your audiobook attractively, which is not hard to do given what the Big 5 charge. All the while keep in mind it’s worth a try, but don’t expect much.
BOOKBUB: I ran some ads with Bookbub throughout the year my audiobook released. It’s a fairly intuitive process and you get a great deal of control over how the ad runs and when it runs and to whom it goes, based on which authors they follow. I didn’t go with anything other than Bookbub because most ads seemed either ineffective or too complicated to be worth my time. Bookbub will get you some sales, but don’t expect to profit. Expect to practically give away your audiobook (for like a dollar or two) and break even. I made a few bucks during Memorial Day and July 4th (roadtrip dates) because some people bought my audiobook at full price from Audible (which is weird since I had it on sale for a lot less on Chripbooks…I guess these people were just not interested in signing up with other retailers.)
Link Roundup
EQUIPMENT:
I use a Tula Mic but I hear good things about the Blue Yeti. You can look on YouTube for reviews, but don’t go down the rabbit hole or you’ll go crazy!
RECORDING:
ACX Check Plug-in. You WILL NEED this to make sure you meet ACX's recording standards.
De-Clicker Nyquist plugin for Audacity. (to get rid of disgusting mouth noises)
EXTRAS (because everyone's voice is different):
Like I said at the beginning, I considered recording a video of me editing a Substack post, but I realized that would probably be a day of video recording and editing and I don’t know if anyone’s even interested in this topic. If enough people show interest, I’ll consider it.
What do YOU think?
Thoughts? Questions? Are you an audio expert and you want to tell me how I’m doing everything wrong? Feel free to leave a comment!
I am not sure whether I'm going to go down this route, but I've saved your post and definitely appreciate your going through the process of explaining it for us!
Thanks for this post. Will be embarking on this myself—so glad to have found your post. I would love a video of your editing process on Substack. Just wading into Substack and have barely begun. I plan to listen to your audio book. Not a bad way to promote it here. 😁